
In our fast-paced lives, finding time for self-care and relaxation is essential for our overall well-being. One effective way to rejuvenate both the body and mind is through self-massage with a foam roller. Foam rolling, also known as self-myofascial release, allows you to target specific areas of tension and tightness in your muscles, promoting relaxation, improving flexibility, and reducing muscle soreness. In this blog post, we will guide you through the art of self-massage with a foam roller, providing step-by-step instructions on how to effectively release tension and unlock the benefits of this rejuvenating practice.
Section 1: Understanding Foam Rolling
1.1 What is Foam Rolling?
Foam rolling involves using a cylindrical foam roller to apply pressure and release tension in your muscles. The technique targets the fascia—a connective tissue that surrounds and supports your muscles, bones, and organs. By rolling the foam roller over specific areas of your body, you can stimulate blood flow, break up adhesions, and release muscular tightness and trigger points.
1.2 Benefits of Foam Rolling
Foam rolling offers a wide range of benefits, including enhanced flexibility, improved muscle recovery, injury prevention, pain reduction, and stress relief. By incorporating foam rolling into your self-care routine, you can optimize your physical health and well-being.
Section 2: Getting Started with Foam Rolling
2.1 Choosing the Right Foam Roller
When selecting a foam roller or substitute, consider its density, size, and texture. Softer foam rollers are suitable for beginners or those with increased sensitivity, while firmer rollers provide a deeper tissue massage. Opt for a size that suits your body and allows you to comfortably roll different muscle groups. Additionally, textured foam rollers with ridges or bumps can offer additional targeted pressure.
2.2 Preparing for Foam Rolling
Before you begin your self-massage session, it’s important to prepare your body. Wear comfortable clothing that allows for freedom of movement. Find a quiet and spacious area where you can lie down and perform the movements without any restrictions. Make sure to hydrate adequately before and after your session to support optimal muscle recovery.
Section 3: Self-Massage Techniques with a Foam Roller
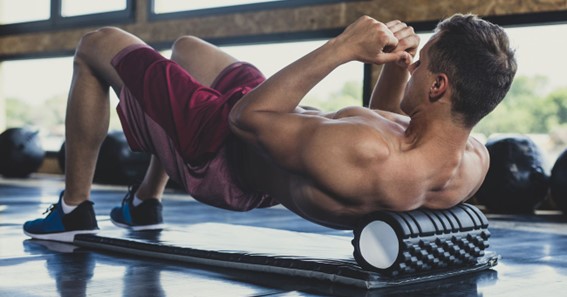
3.1 Upper Back and Shoulders
To target the shoulders and upper back, start by sitting on the floor with the foam roller placed horizontally behind you. Lie back, positioning the foam roller at the base of your shoulder blades. Bend your knees, feet flat on the floor, and place your hands behind your head for support. Engage your core and slowly roll up and down, focusing on any areas of tension or discomfort. You can also cross your arms in front of your chest to intensify the pressure.
3.2 Glutes and Hips
For the glutes and hips, begin by sitting on the foam roller with your knees bent and feet flat on the floor. Shift your weight onto one side, placing your hand on the ground for balance. Cross your ankle over the opposite knee, creating a figure four shape. Roll back and forth, allowing the foam roller to target the muscles of the glutes and hip. Switch sides and repeat the movement.
3.3 Calves and Hamstrings
To release tension in the calves and hamstrings, sit on the floor with your legs extended and place the foam roller under your lower legs. Position your hands slightly behind you for support. Lift your hips off the ground and use your hands to shift your weight, rolling the foam roller up and down your calves and hamstrings. Pause and apply extra pressure to any tight spots you encounter.
3.4 Quadriceps and IT Band
Lie face down on the floor with the foam roller placed vertically beneath your thighs. Position your elbows and forearms on the ground to support your upper body. Roll up and down, targeting the quadriceps muscles. To address the IT band—a long band of connective tissue on the outer side of your thigh—position your body slightly to the side, with the foam roller placed under your outer thigh. Roll from the hip to just above the knee, pausing on any areas of tension.
Click here – How an Online Microbiology Tutor Can Help You Ace Your Exams
Section 4: Tips for an Effective Self-Massage Session
4.1 Take It Slow
When foam rolling, it’s important to move slowly and mindfully. Allow the foam roller to sink into your muscles, focusing on areas of tightness or discomfort. Spend approximately 1-2 minutes on each muscle group, gradually increasing or decreasing the pressure as needed.
4.2 Breathe and Relax
As you perform self-massage with a foam roller, remember to take deep, slow breaths and consciously relax your muscles. This will enhance the effectiveness of the massage and promote a sense of overall relaxation.
4.3 Listen to Your Body
Everyone’s body is unique, so it’s important to listen to your body’s feedback during a foam rolling session. If an area feels particularly sensitive or painful, adjust the pressure or move to a different muscle group. Discontinue the exercise if you experience sharp or severe pain.
Conclusion
Self-massage with a foam roller is a powerful practice that allows you to release tension, increase flexibility, and promote relaxation within your own body. By incorporating foam rolling into your self-care routine, you can experience the numerous benefits it offers. Remember to start slowly, listen to your body, and focus on proper technique. With consistency and mindfulness, self-massage with a foam roller can become an integral part of your overall well-being, helping you unwind and rejuvenate both physically and mentally.