
Moviemaker MiniTool is a great free video editor software for beginners that wants to edit YouTube videos and create professional looking videos. It is designed for the average person, no matter what your skills or background are. The interface is easy to get the hang of and there are plenty of online tutorials to help you if you get stuck at any point.
Introduction
It has a simple interface that is easy to use, and it comes with all the features you need to get started. You can trim clips, add transitions, and add effects to your videos. Plus, you can also add titles and credits. But with MiniTool Partition Wizard, you can use it easily. This software can maximize your disk’s performance by creating, converting, and resizing partitions between FAT32 and NTFS without reformatting. It can convert disks from dynamic to basic or between GPT and MBR without losing data
Why use MovieMaker MiniTool?
MiniTool Moviemaker is an easy-to-use yet powerful tool. It is the best video editing software for beginners, which means it comes with all the standard tools that users need to merge a video, add music, apply effects, and edit the finished work before exporting it to the local device or sharing it on social media.
The software is very user friendly and has a lot of features that make it perfect for beginners. Moviemaker MiniTool also has a large community of users who can help you with any problems you may have while using the software.
Click here – RomanovaMakeup: The New Cosmetics Brand Available in UAE
How to Download and Install MovieMaker MiniTool
MovieMaker MiniTool is a great free video editing software for beginners that want to edit YouTube videos and create professional looking videos. The software is very easy to use and has a lot of features that allow you to create great looking videos. In this article, we will show you how to download and install MovieMaker MiniTool on your computer.
First, you need to go to the Moviemaker MiniTool website and download the software. Once the software is downloaded, double-click on the file to start the installation process.
The first screen that you will see during the installation process is the Welcome screen. On this screen, you need to click on the “Next” button to continue with the installation process.
On the next screen, you will be asked to select the installation location for MovieMaker MiniTool. It is recommended that you leave the default location and click on the “Next” button.
On the next screen, you need to select whether you want a desktop shortcut for MovieMaker MiniTool or not. It is recommended that you leave this option selected and click on the “Install” button.
Once the installation is complete, you will be asked if you want to launch MovieMaker MiniTool now. It is recommended that you launch the software so that you can start using it right away.
Install MiniTool MovieMaker
Step 1: After getting MiniTool MovieMaker, users can double-click the installation package to get the following welcome interface.
Step 2. Click Install to install the software to the default location or click Customize Install to choose an installation location to install this tool.
How does Moviemaker MiniTool work?
MiniTool will start looking for lost files in the location you specified, displaying them in a File Explorer-like view. Once the results start populating, you can pause the scan to look through them. You can search for specific file names or just browse through the list to see if there is any file you want
It’s easy to use and has a simple interface. You can add effects, transitions, and titles to your videos, and you can also trim and crop your videos. Movie maker MiniTool also allows you to add music to your videos and export them in HD quality.
Click here – Fixed Deposit Interest Rates for Senior Citizens: Benefits and Limitations
The Interface for MovieMaker MiniTool
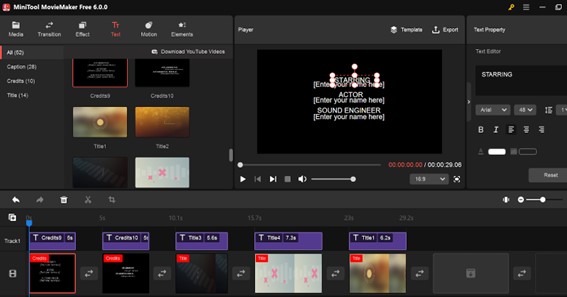
The interface for MovieMaker MiniTool is simple and straightforward. The main windows video editor is divided into three sections: the preview pane, the toolbar, and the timeline. The preview pane shows you a live preview of your video as you edit it. The toolbar contains all of the tools you need to edit your video, such as trimming, adding transitions, and adding text. The timeline is where you actually add and edit your video clips. To add a clip to the timeline, simply drag it from the preview pane into the timeline. To edit a clip, click on it in the timeline and make your changes in the toolbar. Moviemaker MiniTool makes editing videos easy and fun!
Working with Video Files in Moviemaker MiniTool
To import video/image/audio to a new project:
- Launch MiniTool MovieMaker, and close the Project library window.
- Click Import Media Files.
- Locate the files users want to import and then click Open.
- Then, MiniTool MovieMaker loads all these files. Users can check media files in the Media library.
Here are some tips on working with video files in Moviemaker MiniTool:
To import video files into MovieMaker MiniTool, simply drag and drop the files into the software interface.
Once your video files are imported, you can then begin editing them by adding various effects, transitions, and titles.
To export your edited movie, go to File > Export and choose the desired file format and resolution.
Saving your Project File (.myp) in Moviemaker MiniTool
When you’re ready to save your project file in Moviemaker MiniTool, simply click the “File” menu and select “Save As.” In the pop-up window, select the location where you want to save your file and give it a name. Make sure to include the “myp” extension at the end of your file name so that Moviemaker MiniTool can recognize it as a project file. Once you’ve saved your file, you can open it again in MovieMaker MiniTool at any time by clicking the “File” menu and selecting “Open.”